How To Build A 30 Strut Soda Straw Dodecahedron
George Hart, the master geometer, has this procedure on his website, http://www.georgehart.com%7CGeorgeHart.com
Step-by-Step Instructions by George Hart, from the website:
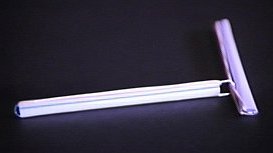
- Gather materials for 30 struts. Each strut is made from half a straw, two small paper clips, and one thin rubber band. You also need scissors for cutting the straws in half. Rubber bands of the correct length are essential. They should be about 75% to 85% of the length of the half-straw, so when stretched the length of a half-straw, there is some tension in the rubber band, but not enough to buckle the straw. So find:
scissors, 15 straws, 60 small paper clips, 30 thin rubber bands.
- Cut one straw in half. For this model, I started with 8-inch straws, to make the 4-inch struts shown here.
http://www.georgehart.com/virtual-polyhedra/figs/straw1.jpg
- Assemble your first strut: Pass the rubber band into the large end of a paper clip and stick the small end of the clip into one end of a half-straw. In the same manner, pass the same rubber band through a second paper clip which gets inserted into the other end of the straw. (If the rubber band is hanging loose after this, it is too long; so either buy shorter rubber bands or use a longer length of straw. Conversely, if it seems that the straw may bend from the tension, get longer rubber bands or cut the straws shorter.)
http://www.georgehart.com/virtual-polyhedra/figs/straw2.jpg
- Next, build a second strut, and link it to the first as shown. If you partially pull out one paper clip of the first strut, you can easily thread the rubber band of the second strut through it. Have them meet at a point about one third of the way from one end.
http://www.georgehart.com/virtual-polyhedra/figs/straw3.jpg
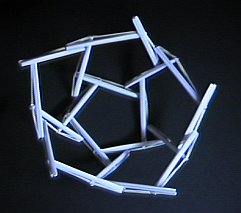
- Make three more struts and link them similarly so as to close a 5-sided loop, seen in the center of this figure. This corresponds to one pentagon of the underlying dodecahedron.
- Next add five outward-pointing struts, each of which connects to the 5-sided loop in two places. The figure shows three of these five new struts surrounding the central pentagon:
The one on the right is connected at its two points and so makes a small triangle --- one such triangle appears at each vertex of the dodecahedron. The one in the middle has one of its two connections made and needs a second to close its triangle. The one on the left is in position, but needs both connections.
http://www.georgehart.com/virtual-polyhedra/figs/straw4.jpg
- The pentagon and five outward struts of the above steps provide three of the five sides for the next five pentagons, surrounding the central pentagon. Finish each of these five pentagons and you can see half of your complete dodecahedron, as in the figure at right. Just remember to complete each loop of struts to have 5 sides. You are actually two thirds done at this point, as you have used 20 of the 30 struts. Be careful that the rubber bands are all on the same side: in the image above, the rubber bands are on the top; at right this has been turned over so the rubber bands are on the outside and the straws are on the inside.
- Continue building pentagons for the second half in a similar manner until complete. Just remember that each rubber band contacts four others --- at the ends and at the 1/3 and 2/3 points. Every endpoint spirals into a little triangle going in the same direction (either all clockwise or all counterclockwise, it is up to you.)
- When done, adjust the struts so they meet each other close to the 1/3 and 2/3 points, and you're done.
Links and References
For another picture of this twisted Dodecahedron please see the following page on Antiprism site
http://www.antiprism.com/album/835_tens_models/tens_30_Lrg.jpg
You will find a huge number of photographs of other tensegrity structures.
If you wish to learn to generate computer models of tensegrity structure, Antiprism site has the software for free download and use.