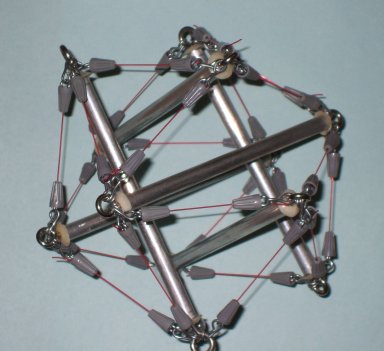
Icosahedron WIth Mitch Amiano's Connectors
Icosahedron With Mitch Amiano's Connectors
This model of a tensegrity icosahedron has been on the shelf for several years. It has aluminum struts terminated with non-threaded shoulder-eye "blanks" pushed into pan-head nylon anchors.
The original model, like most hobbyist and even commercial kits, used rubber bands as tension chords. I was looking for something more... scalable. One of the points of such models is to illustrate a large-scale design principle on a small scale, but rubber bands are really not a fair approximation of materials actually used in constructing larger tensegrities. So I took the opportunity of the holiday vacation to rework the model with construction grade materials.
Rubber bands, "bungie" cords, stretch cord, and the like, are ok for a crude approximation, but there are difficulties with using very flexible materials. First, rubber-based products decompose relatively rapidly upon exposure to air. A model will be sitting on a shelf, and one day you'll hear a twang and see the model bounce onto the floor. Second, such models are supposed to be engineered, at least in principle, which means calculating lengths, working loads, deflection, etc, etc, etc. But working with cheap rubber straps, hoops, and/or knotted cord means that tension loads will be unpredictable, even in principle. One recent article on tensegrity masts in Make magazine referred to a step in the construction process as "fluffing" the model. That's ok for straw models using band-aids and masking tape, but I wanted something predictable.
I envisioned the solution way before I found it: the problem called for an adjustable axial connector, that is, one that is in-line with the tension cable. The function would be sort of like a turnbuckle, in that the tension could be adjusted post-construction, but it would be connected at the terminal ends of the cable. This eventually led me to dead-end terminals, then to swageless connectors, which can be found in the boating industry. Yet, I was unable to find any manufacturer supplying such connectors in a small enough size; anyway, at +$20 each commercial products are way too expensive for model building.
After a lot of searching over the holiday, I devised a method using low cost off-the-shelf parts to emulate the swageless rigging. The parts included electrical wire nuts, shoulder eyes, and monofilament fishing line. A 1/16" drill bit, cordless drill, wood-and-nail jig, a spring clamp, and some needle-nose pliers, completed the tools necessary. A close-up of the terminal end is shown on the right of this image, http://bp1.blogger.com/_fzEHlKG_1HY/R3rgDWS8c4I/AAAAAAAAABk/HGLmJYudiyA/s1600-h/terminalend.jpg
I was initially worried that the threads on the shoulder eyes would shred the monofilament., but informal trials with the micro-rigging showed that it typically failed only under substantial force. Often the cables failed at a point other than the terminal end, so I had my axial connector and an effective procedure for assembling the cables. With this method, it is practical to create tensegrity models with components having predictable cable dimensions.
